Table of contents
- 0.1 Creating the project folder and the virtual environment
- 0.2 Installing
- 0.3 Running airflow
- 0.4 Starting the webflow server
- 0.5 Starting the scheduler
- 0.6 Running an example DAG workflow
- 0.7 Trigger the example bash operator
- 0.8 Checking the executed code and Logs on a DAG
- 0.9 Conclusion
- 1 Don’t miss amazing tips!
Let’s look at How to configure Apache Airflow on MacOS locallyWorkflows may be created, scheduled, and monitored programmatically using Apache Airflow, an open-source platform. It is a well-liked option among data engineers and data scientists since it is a crucial tool for organizing and orchestrating complicated data pipelines.
If you take the right precautions, configuring Apache Airflow on Mac OS should be simple. You may follow the instructions in this introduction to set up Apache Airflow on a Mac OS computer.
Creating the project folder and the virtual environment
You must install Python 3 and pip on your computer before you can begin. Additionally, it is advised that you isolate your Apache Airflow installation from other Python programs on your machine by using a virtual environment.
Installing
To install, create the python environment in the project folder by using the following.
- Open your terminal (or command prompt) and navigate to the directory where you want to create the virtual environment.
- Enter the following command to create a new virtual environment with the name “venv” (you can replace “myenv” with any name you prefer):
python3 -m venv myenvNote: Python 3 may be downloaded from the official website at https://www.python.org/downloads/ if you don’t already have it there.
3. Once the virtual environment is created, activate it by running the following command:
source venv/bin/activateThe name of your virtual environment should now appear on your command prompt, indicating that you are now working in the environment.
Similar to how you would in a typical Python environment, you may use pip to install packages in your virtual environment.
Install airflow via pip
The next step is to use pip to install Apache Airflow after setting up your environment. You must have set up a database and adjust Apache Airflow’s settings after it has been installed. Although you may use any database, SQLite or PostgreSQL are the most often used choices.
pip install apache-airflowConfirm airflow has been properly installed by typing the below in your terminal.
airflow --help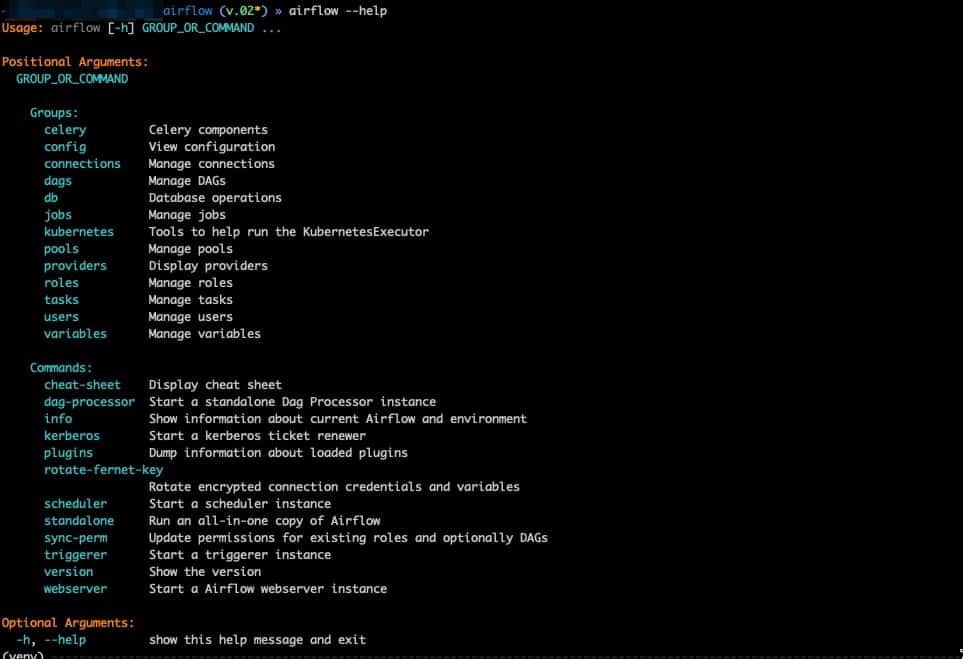
If all went well, you should see the following. The help command lists all available commands that are within airflow.
Running airflow
First, let’s start by initializing the airflow db. Type the following on your terminal]
airflow db init
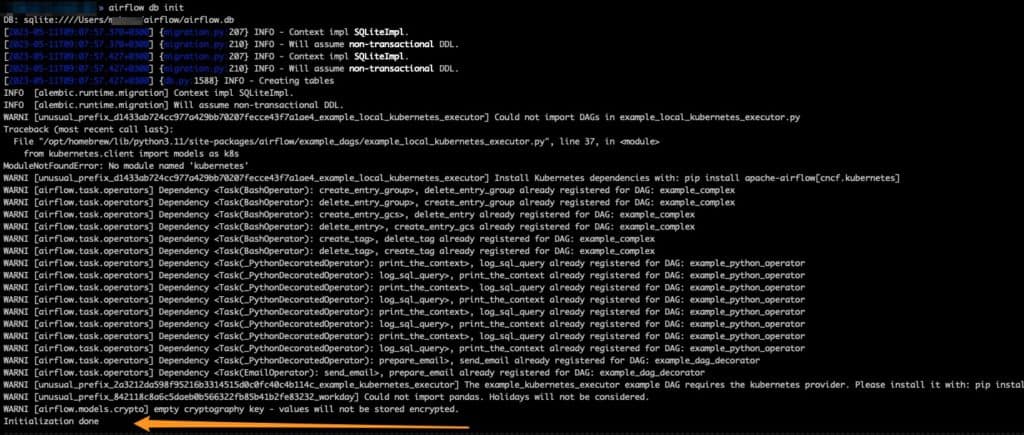
If successful, you should have the following. You will notice that my system does not have kubenetes installed, but we can ignore that for now – since it is not our focus. We should watch out for “Initialization done” at the end of the prompt instructions, which means that our sqlite db has been successfully initialized.
Starting the webflow server
To start the server, type in the following.
This will start the web server on port 9090. You can access the Airflow web interface by navigating to http://localhost:9090 in your web browser. You can replace the port number with a port you prefer.
airflow webserver --port 9090At this point, you will have the below output.
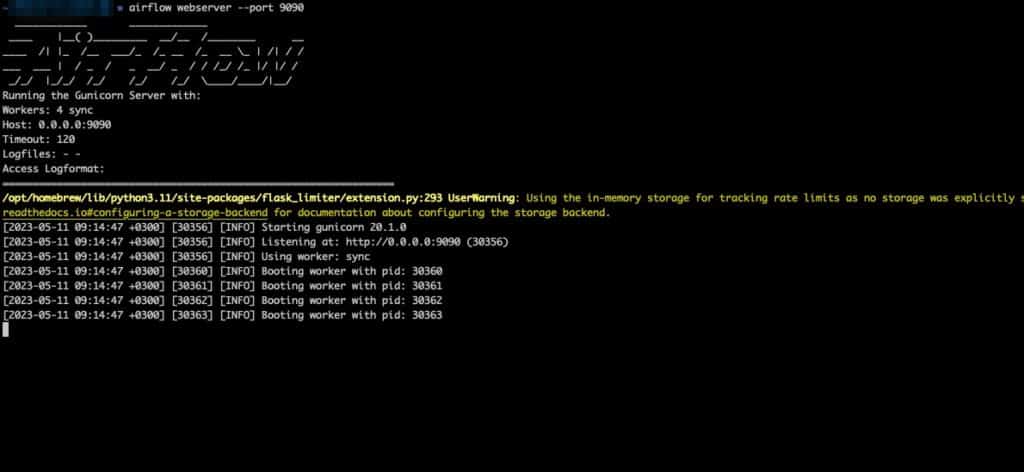
Successful airflow webserver has started.!
Note: If you navigate to your localhost port at this point, you will note some warnings.
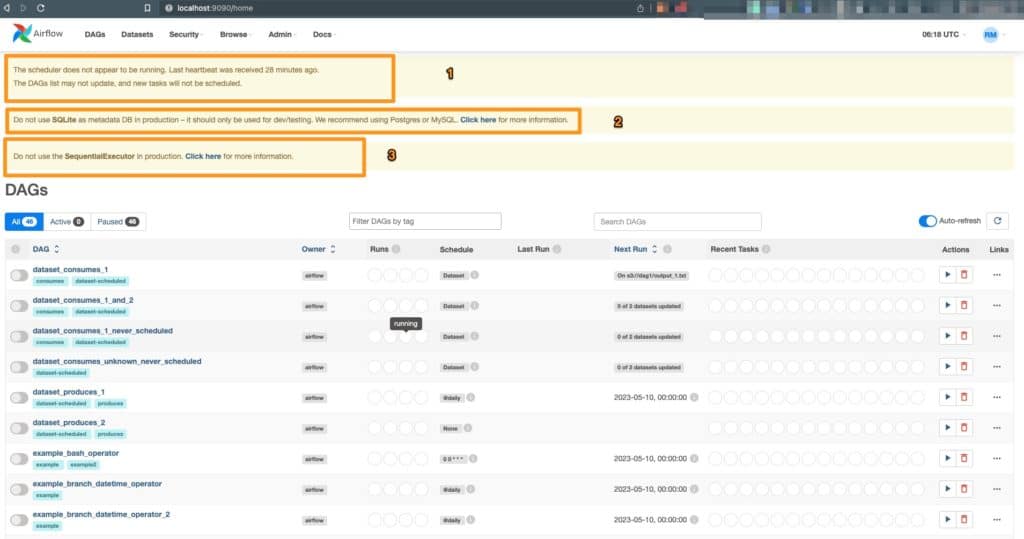
- In this case, our scheduler is not running. The timely completion of activities and the control of their interdependencies are the responsibilities of the Airflow scheduler. The scheduler operates on a regular basis, and how it behaves is determined by its configuration. You can get alerts in the Airflow logs if the scheduler is having any problems.
- Do not use SQLite in Production.
In a production setting, using SQLite as the metadata database might result in problems like:
Database locking: SQLite is a file-based database, therefore locking problems can occur when several programs attempt to access the database at once. Task execution delays and failures may result from this.
Limited concurrency: Because of SQLite’s limited capability for concurrency, performing numerous processes at once might be problematic. Performance problems and delays in job completion may result from this.
Issues with scalability: Due to SQLite’s restricted scalability, handling massive amounts of data might be difficult. Data corruption and sluggish performance may result from this.
3. Do not use the SequentialExecutor in production.
One of the built-in executors in Airflow, the SequentialExecutor, runs jobs sequentially, one at a time. As it offers no parallelism and cannot manage concurrent task execution, it is mostly used for testing and development. Using the SequentialExecutor in production settings when there are several tasks to complete might result in sluggish task completion and subpar performance overall.
The SequentialExecutor should not be used in production for the following reasons:
Limited parallelism: Because the SequentialExecutor runs tasks sequentially, one at a time, it is unable to run several tasks at once. When several activities must be carried out simultaneously, this leads to slower task execution and poor performance.
Starting the scheduler
In order to start, navigate to a new terminal and type the following command.
airflow scheduler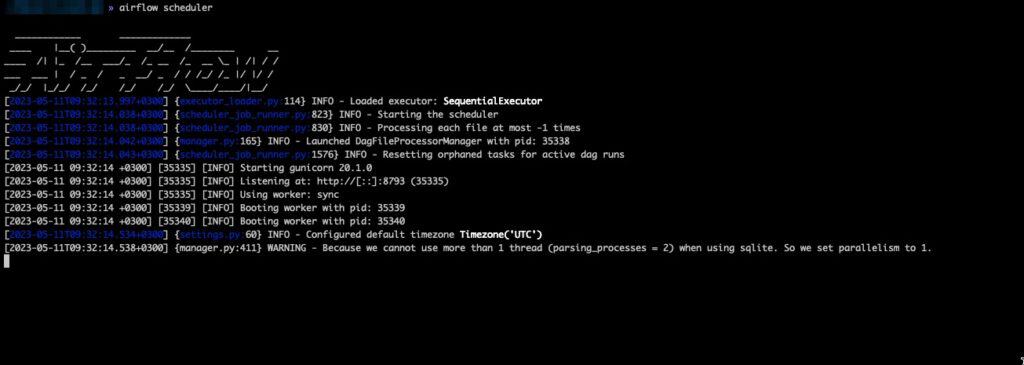
This should kick start the scheduler and we will be able to see logs on the terminal.
If we refresh our browser, the first warning about the scheduler should be gone!
Running an example DAG workflow
Now that we have airflow installed locally, it’s best if we we could try one of the sample DAGs that come pre-installed during installation. Although we can easily disable this, for now, we will work with one of the examples.
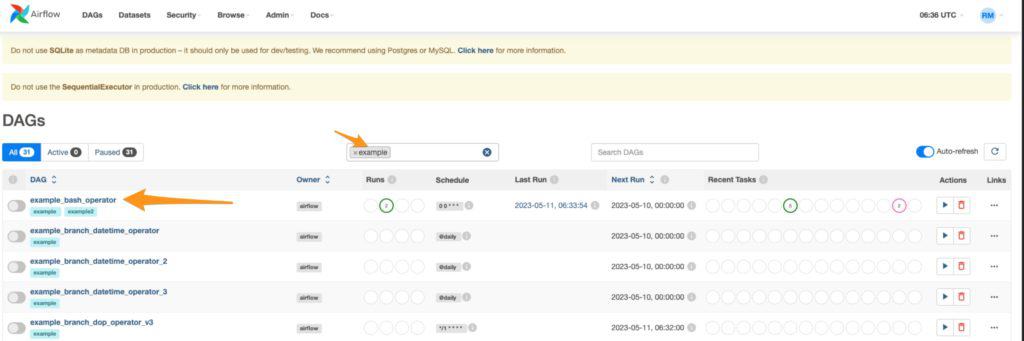
On the Airflow dashboard, type “example” on the filter textbox and select the first example option.
Trigger the example bash operator
Trigger the example by clicking trigger DAG as shown below
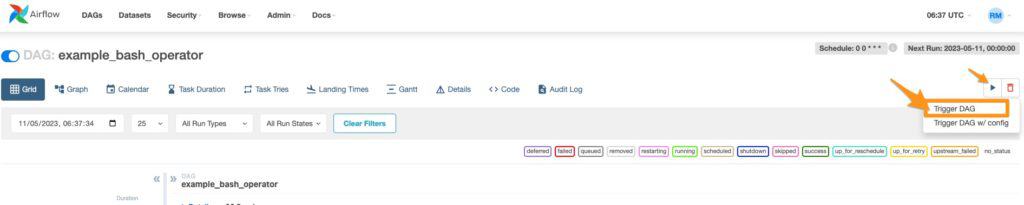
This trigger will start the dag and display some messages with the bash command. But what code is being triggered in this example?
Checking the executed code and Logs on a DAG
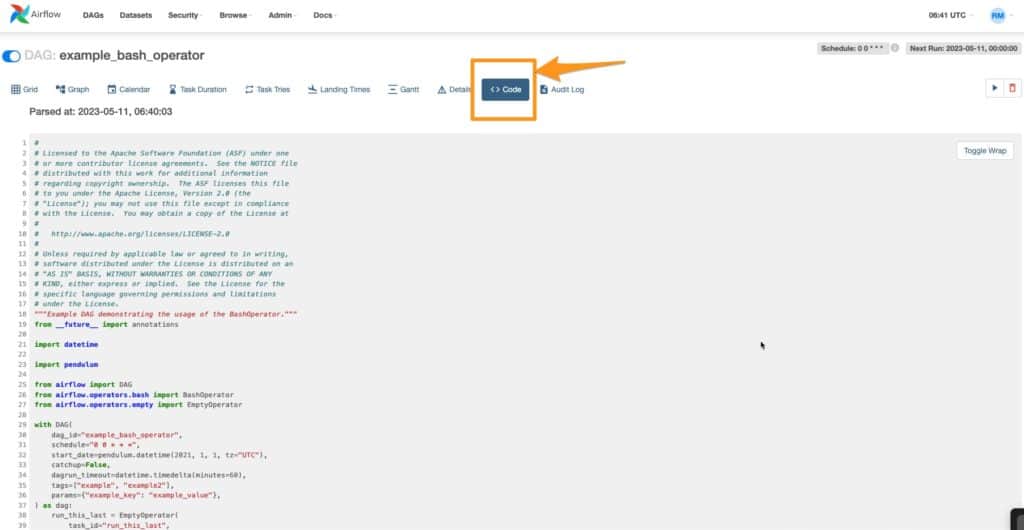
You can view the code the DAG is running by clicking on the Code tab. Additionally, logs for each flow can be checked on thr Graph tab. But we can have a look at this in detail later.
Note: You can check the log directory specified in your Airflow configuration file to see where the logs are stored. By default, the log directory is located in $AIRFLOW_HOME/logs.
Conclusion
In conclusion, setting up Apache Airflow on a local system may be simple, especially on macOS as Homebrew can be used to do it. After installation, you may launch the web server and scheduler, establish the Airflow database, and construct and use DAGs.
It’s crucial to remember that while Airflow is quite simple to install, configuring and properly using it may be challenging. It is advised to have a solid grasp of Airflow’s design, ideas, and best practices in order to get the most of it. Depending on your use case, you might also need to install and set up more requirements, including a message broker and a database.
You might be interested in how to implement merge sort and quick sort algorithms in python 3.