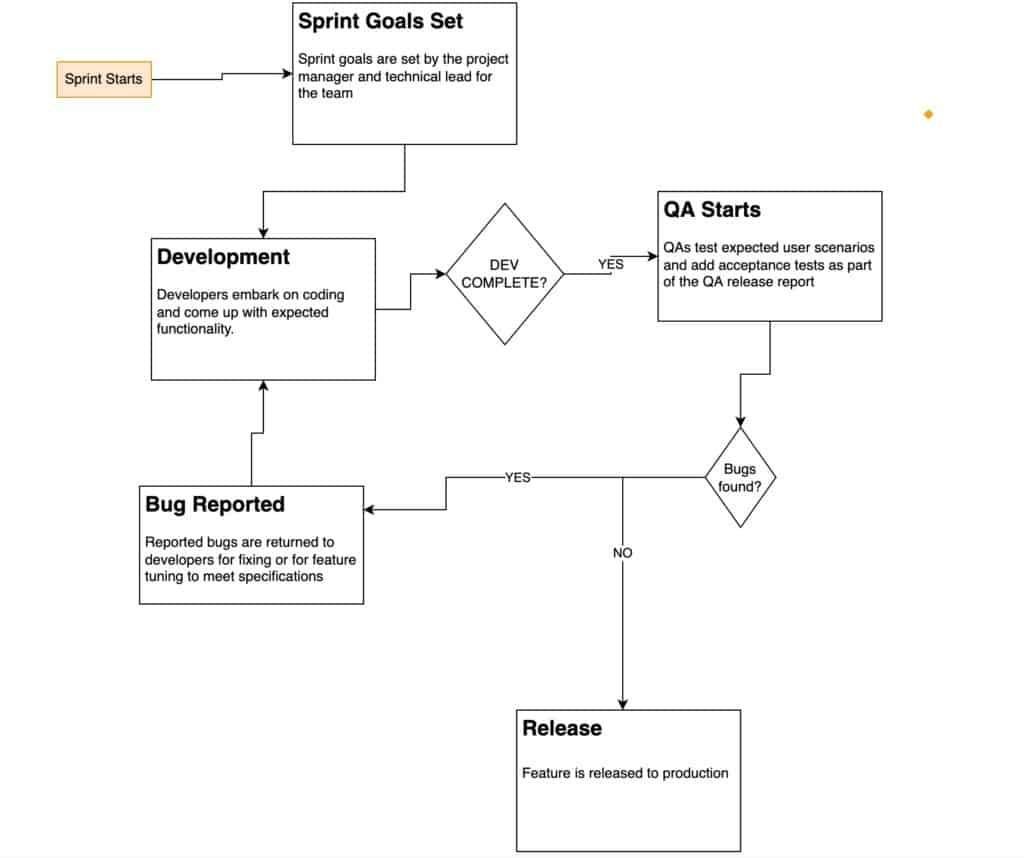
Interested in How to implement a QA Process Flow in a Sprint? Then look no further! This design process flowchart is used in Quality Assurance (QA) for testing software, websites, and mobile devices before they are released to the public. This process usually starts with a sprint kickoff, development and even to the point when QA is approached with/discovers a problem that needs to be fixed before release.
The flowchart itself tells the story of how it all begins from sprint kickoff to when an issue is spotted in testing or when QA might think up an idea for how to improve something on their own.
One major advantage of this process is that it cuts down on the time and resources needed to finish a project or test.
Process on how to implement a QA Process Flow

Let’s have a look at the step by step process for this flow.
1.) Setting sprint goals ?
It is recommended to follow the agile process of SCRUM. In this framework, each sprint is divided into two parts. The first is called backlog grooming – where the Product Owner and stakeholders meet to decide what features will be developed in the upcoming ‘sprint’.
a.) Sprint planning
Next, it’s on to sprint planning – where stories are added to the Sprint Backlog and tasks are assigned for each.
b). Start sprint execution
Here, work gets done throughout the sprint – with daily meetings (SCRUM standup) held to discuss progress and tasks assigned during sprint planning being completed.
Although the two processes have not been included in the diagram flow, it is important to know that they exist as part of the sprint process ceremonies.
2) Software development ??
This is the process of turning ideas into working software.
In this stage, a detailed design document is created as an outline for the coder to follow as he writes code. Any changes of direction will be reflected in the design document. This stage can take a few days or even weeks depending on how large and complicated the project is, and how long it usually takes to create a product of this kind.
3) QA process ?
The purpose of QA at this stage is to ensure that the feature meets all requirements, works as designed follows security standards and handles conversions correctly. This is also the stage where validation of test cases, ‘beta-testing’ and ‘peer reviews’ are done.
4) Release ?
When the product has been tested and verified and QA have given it a go ahead, it is ready to be released as a new version to the public. Checks must be carried out to ensure that the version has no major bugs or compatibility issues with other programs on your system. If there are any problems, then the fix must be re-tested against the original requirements before being made accessible to users as can be seen in the flow chart.
The above are some best practices and rules of thumb to consider while trying to create a good quality assurance process.
It is important to keep the process under regular review and to maintain the quality of the process. To do this, a meeting should be scheduled, where the steps are looked at and assessed. If necessary, changes should be implemented according to need.
A major reason for conducting reviews is to reduce errors!
It is also important that users of the process know what each step means in terms of input, output and activity. This will help them understand how it works.
Conclusion
Test cases are the foundation of QA process and they should be reviewed regularly. These test cases should be written in agreement with the requirements of the software application. This is the only way to ensure that the finished product works as expected.
One of the major advantages of using a written test case is that it helps people to understand what each step means in terms of input, output and activity, which will help them understand how it works.
Another advantage of using a written test case is that you can capture requirements/issues easily as you write them in your test case. If changes are made in any requirement, tests will not stop working because all requirements are captured in one place.
Read an interesting article on how to write good test cases with examples.

