Table of contents
- 1 What is postman?
- 2 Why use postman?
- 3 What are postman Collections
- 4 What is a postman Request?
- 5 Can postman be used to test?
- 6 Getting started: How to mock API calls
- 7 Step I: Creating a collection.
- 8 Step II: Create our first request
- 9 Step III: Creating the mock collection from your Collection
- 10 Step IV: Creating the mock request
- 11 Step V: Attempt to run request against the mock server
- 12 Step VI: Fixing the 404 error by adding an example
- 13 Step VI: You should now have an example with the following inputs
- 14 Step VII: Testing our mock responses
- 15 Well done!
This quick article assumes that you have postman installed on your laptop already, we will have a look at how to mock API calls in postman – step-by-step from scratch.
If not, check this tutorial on how to install postman on macOS, if you are using a different OS, do a quick search on how to install postman on your OS and create a workspace, then join us back on step I.
If you would like to read more about APIs and why they are important, see this article.
What is postman?
Postman is an application for developers to test their APIs or webhooks without having to do some coding. Postman lets you create collections, each containing different URLs that you can send requests to, along with the parameters needed for each request. You can use Postman on your desktop or on the go, and it works with any programming language.
Why use postman?
Postman helps you to automate your testing process and it helps you to maintain a clean collection of tests.
What are postman Collections
A Postman collection is a collection of tests that can be exported and imported into any instance of Postman across any platform. The following image demonstrates how different sets of collections can be used for different aspects of API development.
What is a postman Request?
A Postman request is the collection of parameters that you will send to your API or webhook endpoint. A postman collection can contain multiple requests, but each request may only contain one parameter.
Postman provides access to the headers, response, headers and response parameters of your API calls. Access to HTML headers – Depending on your requests, you may be making HTTP requests directly to the server over HTTPS or performing Ajax fetches (via XMLHttpRequest) or custom asynchronous callbacks (via jQuery). You will be able to access both responses generated through these methods as well as the generated headers.
Access to JSON Parameters – Postman provides access to all parameters that are returned by POST requests (i.e., not GET).
When creating a request, we have to add relevant parameters which may vary depending on what are we trying to achieve. Our example below will demonstrate this.
Can postman be used to test?
Yes, Postman is used to test APIs, however it can be used in many other ways.
HTTP Methods – Postman can be used to test HTTP Methods like POST, PUT, GET, HEAD and DELETE. You can also test custom methods with Postman such as “Statuses” or “Deleted” HTTP Methods.
Parameterisation
You can parameterise your requests which enables you to make multiple changes to one request and test different data sets at the same time, ensuring that your API works for multiple users. You can create a parameter by right-clicking on a specific URL and selecting Parameters. Postman provides you with a base set of parameters such as “response”, “query” and “cookie”.
It also allows you to create parameters for additional information such as the username, password, ID or any other information that needs to be added into your request.
Postman reports
Postman lets you save your tests and reports into collections that can be shared with the team, exported and imported into any instance of Postman across any platform. You can create a report by right-clicking on a specific request and selecting “Save As Collection”.
Enough with the introduction, let’s get started..
Getting started: How to mock API calls
Companies often prefer JSON-based APIs because they allow for increased flexibility. In addition, JSON-based APIs can be accessed by various programming platforms and devices.
Step I: Creating a collection.
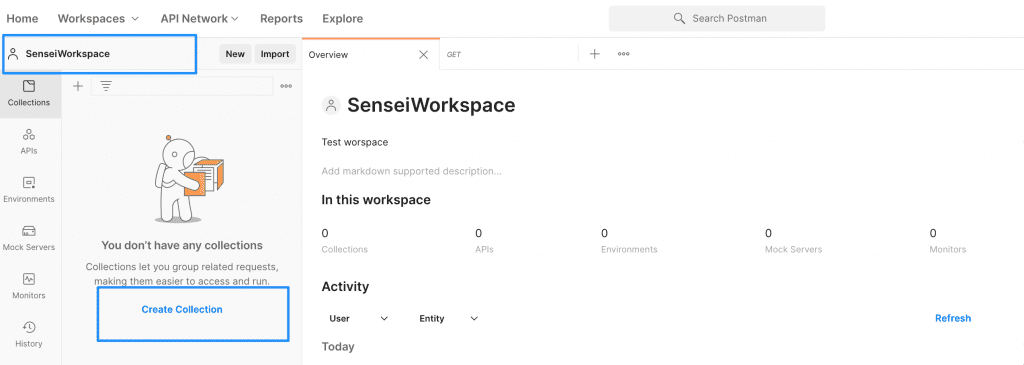
Make sure you are already in the workspace and click on create workspace > Give your workspace a name (I have named my workspace as `ZipCoder`) – since the sample API we will be using is a Zip Coder app.
Step II: Create our first request
Click on create request, select GET as the HTTP verb > input the following as the URL and click send.
http://api.zippopotam.us/us/90210
Note: ‘90210’ is a state Zip Code for Beverly Hills.
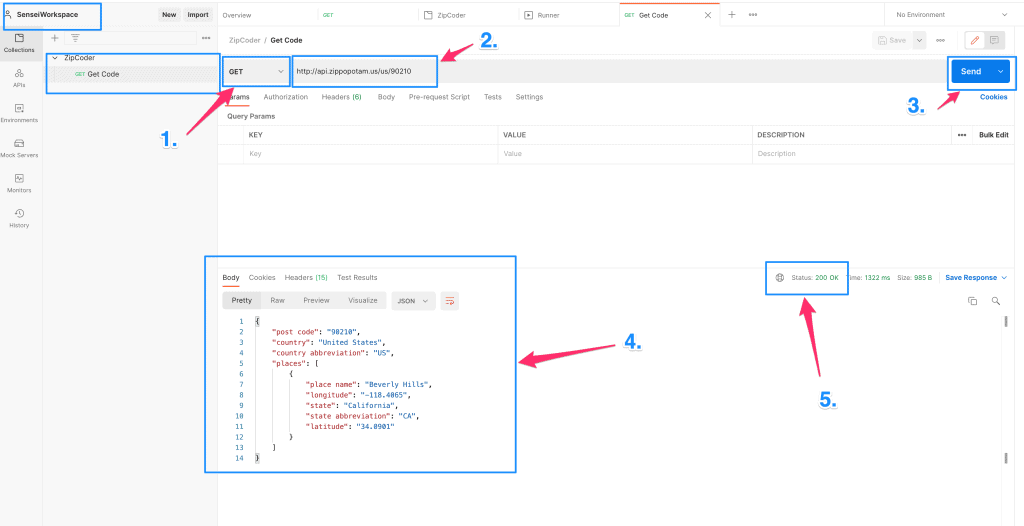
Your request should look like the image on the left after hitting send.
Sample response
{
    "post code": "90210",
    "country": "United States",
    "country abbreviation": "US",
    "places": [
        {
            "place name": "Beverly Hills",
            "longitude": "-118.4065",
            "state": "California",
            "state abbreviation": "CA",
            "latitude": "34.0901"
        }
    ]
}
Let’s look at what the different sections stand for from the given request.
| 1. This is the HTTP verb to be used when making the request. To learn more about HTTP Verbs, have a look at this article that outlines what each verb does when a request is sent. | |
| 2. This is the request URL which we make our request to, in our case we are accessing an API hosted at api.zippopotam.us/us/ – we pass in a string 90210 as a parameter to the API | |
| 3. Clicking the Send button will send that request to the API endpoint | |
| 4. This is the response body given the server at the request URL we have input above | |
| 5. This shows the status code given by the server during the response | |
Step III: Creating the mock collection from your Collection
Click Mock Collections and input a mock server name
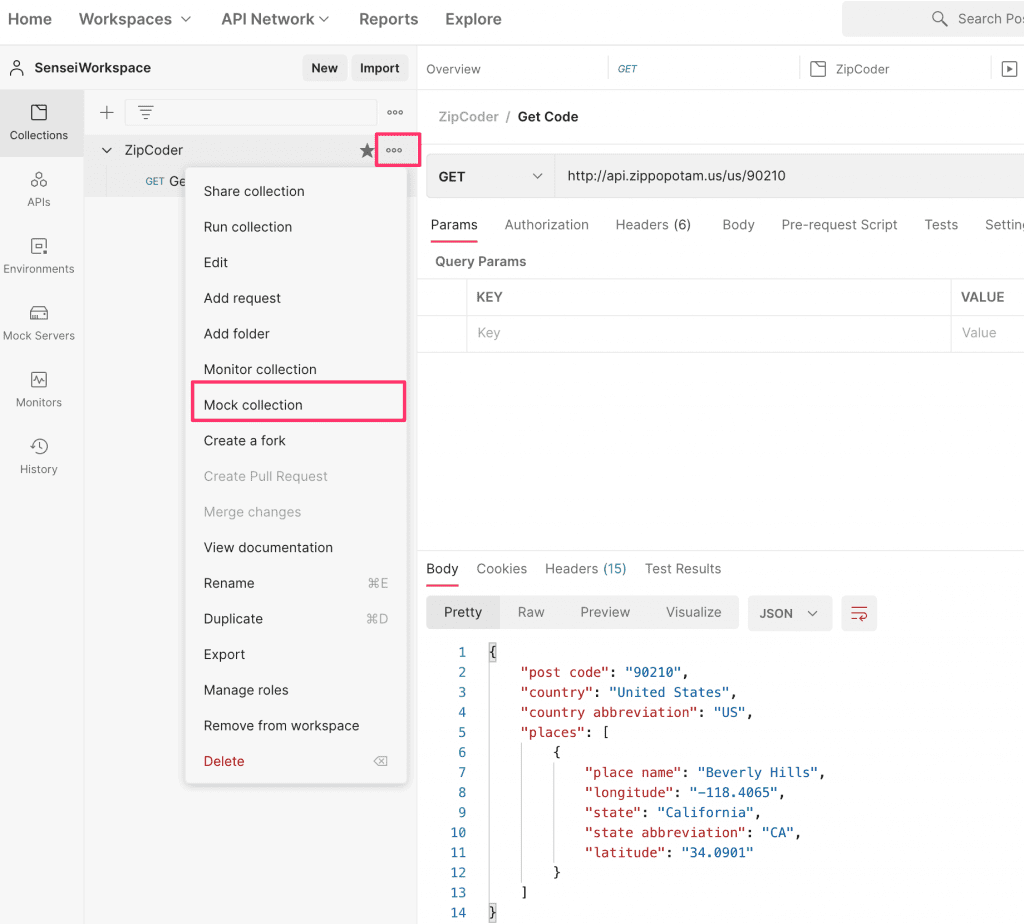
Give the mock server a name – in my case I named it `ZipCoder Mock`
Leave the settings at their default(Save the mock server URL as an environment variable – should be checked) and click create Mock
On the next page, you will see the mock server url generated for you and a URL available created for you as can be seen in the next screenshot
Step IV: Creating the mock request
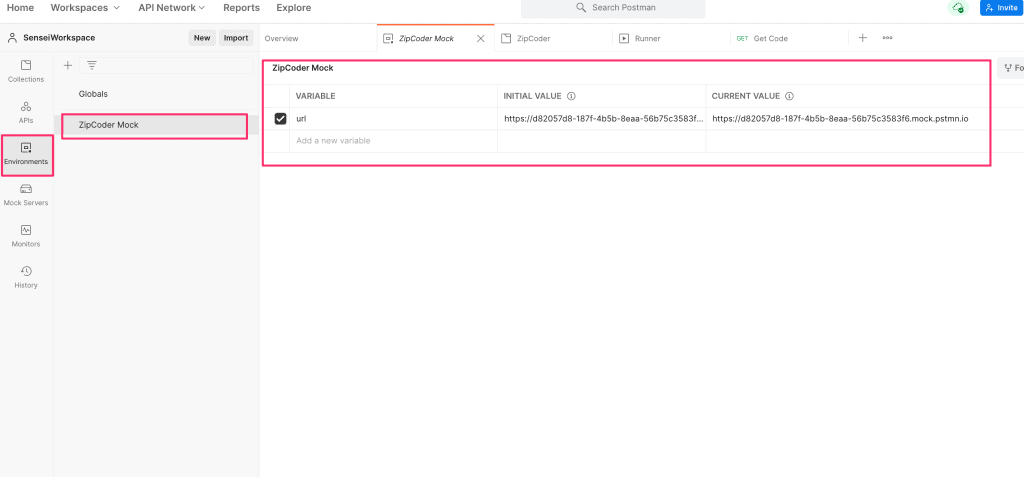
Click Environments > ZipCoder Mock – On the right hand side, you will see that your `url` has been input as a value
Step V: Attempt to run request against the mock server
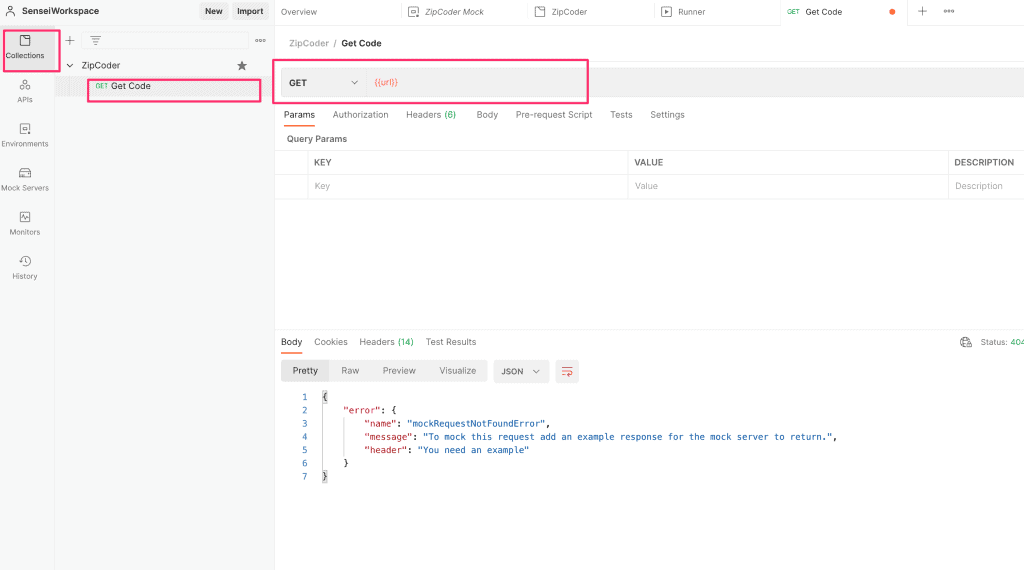
Click on Collections > ZipCoder > Get Code request and replace the URL with {{url}} – this will essentially replace the URL with the new mock url we had just created.
Click Send and observe that we get an error response as below and status 404:
{
    "error": {
        "name": "mockRequestNotFoundError",
        "message": "To mock this request add an example response for the mock server to return.",
        "header": "You need an example"
    }
}
This is good progress! It means we just need to add examples that will aid us in the mock server.
Step VI: Fixing the 404 error by adding an example
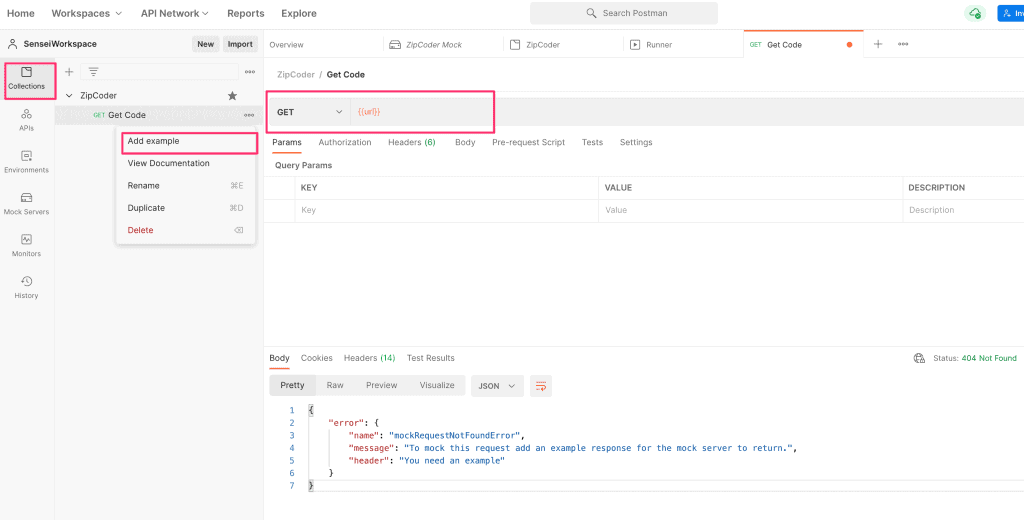
Click add Example and in the next screen add in the following JSON response
{
    "post code": "90210",
    "country": "United States R",
    "country abbreviation": "US",
    "message": "This is a mock response"
}
Step VI: You should now have an example with the following inputs
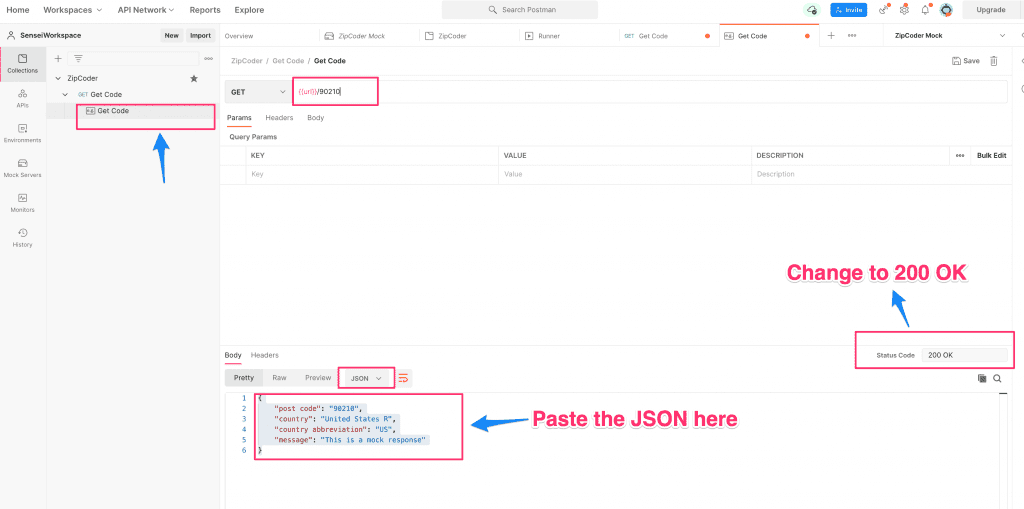
Now we have a 200 OK mocked response, click save and next, let’s add a 404 example response, as shown in the next screenshot.
404 example screenshot
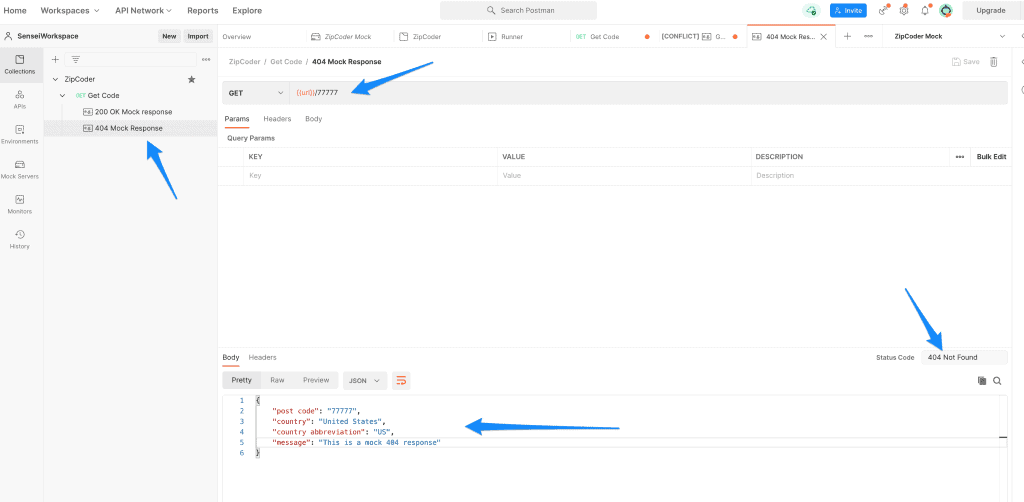
Follow the same process as in step V, but this time – choose a status code 404 not found and paste in the below response.
Note: We use 77777 as a sample zip code for 404 since we know no state has a zip code of 77777
For the 404 mock response, we will input the following JSON response
{
    "post code": "77777",
    "country": "United States",
    "country abbreviation": "US",
    "message": "This is a mock 404 response"
}
Step VII: Testing our mock responses
Now it’s time to test our responses and see if our hard work has paid off!
Click on the Get Zip Request and input 90210 as a string parameter at the end of the URL click send and observe. Similarly, replace 90210 with 77777 in the URL and click send Note the following responses. Ideally, we expect the following results if all went well!
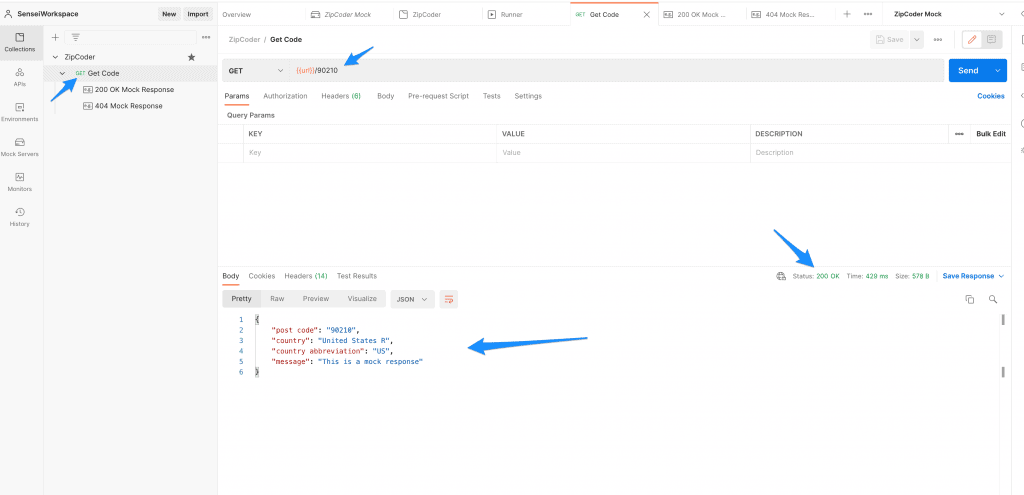
Expected 200 response
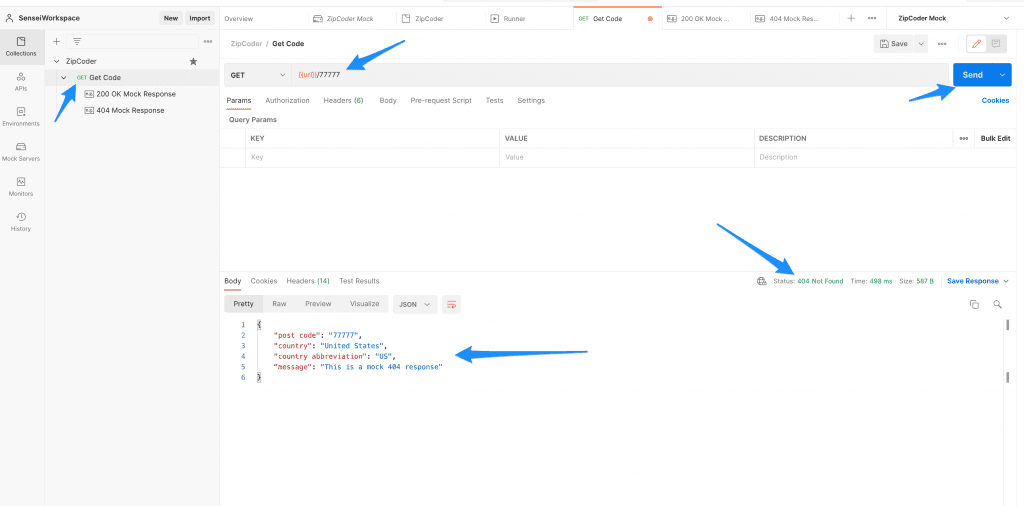
Expected 404 response
Well done!
Congratulations if you have made it through the tutorial! This is the core concept of mocking API responses with postman on a very basic level. As you noticed, each request gets a mocked response on the Mock Server, and you – as a developer – sets which response code and response JSON object you expect from the server.

