Table of contents
In order to go through this selenium ruby tutorial, I hope you have had a chance to go through Selenium — Ruby Automation — Part I in order to catch up with what we will be doing here and the basics to get started on selenium ruby automation — if you need to.
Using the selenium webdriver for ruby, we are going to do slightly more complex actions such as:
- hover/mouse over an element
- click items from a dropdown list
- getting data from web tables.
I will be using a stock chart website for listed stocks in Kenyan companies here: live stocks. (This is a random site I have chosen to demonstrate the concepts).
PS: Feel free to use any other website, so long as it contains the elements we will be automating above.
Goals after this Selenium Ruby tutorial:
- Configure and use chrome webdriver as the default test browser — in Part I, we used firefox as the default web browser. To switch things up a little bit, we will use chrome as the browser for these of tests.
- Use selenium driver to hover/mouse over an element
- Select table elements and looping through the text elements
Configuring chrome webdriver for our tests: To install, follow the
Make sure you have chrome webdriver installed already. If you do, feel free to skip this step. If not, see the links below to help you do that.
Getting Started
Fire up your favourite ide and get started with the script below.
require 'selenium-webdriver'
require 'test-unit'

class SeleniumPartIITest < Test::Unit::TestCase
 # Setup that runs before each test
 def setup
   @url = "https://live.mystocks.co.ke"
   @driver = Selenium::WebDriver.for :chrome
   action = Selenium::WebDriver::ActionBuilder

  @driver.get(@url)
  @driver.manage.window.maximize
  @driver.manage.timeouts.implicit_wait = 30
  @wait = Selenium::WebDriver::Wait.new(:timeout => 7)
 end

def test_market_watch_drop_down
market_watch = @wait.until {@driver.find_element(:link, "Market Watch")}
  puts "#{market_watch.text}"
  assert_equal market_watch.text, "Market Watch"
# Hover over to market watch and hold so that we can view the options

  @driver.action.move_to(market_watch).click_and_hold
  sleep 5

  @driver.action.move_to(market_watch).perform
# We click the mnuPrice list
  price_list =  @wait.until{@driver.find_element(:id, "mnuPricelist")}
  price_list.click
  sleep 3
# select the table by it's id

   the_table = @wait.until{@driver.find_element(:id, "pricelist")}
   trs = the_table.find_elements(:tag_name, "tr")
   trs.each_with_index do |row, index|

    # We will filter out the first five rows to simplify our testing.
    # The reason we filter out rows (0,1,2) is because we want
    # to skip out the title header rows - see diagram
    if(index < 8 && index > 2)
    puts "#{index}"
    tds = row.find_elements(:tag_name, "td")

     # loop through the columns
     puts "------------------"
      tds.each_with_index do |td, index|
      puts "#{index} : #{td.text}"
     end
    else
     #let's ignore rows outside our loop count by doing nothing.
    end
   end
 end

#quit after the test runs
  def teardown
    @driver.quit
  end
end
Wait, what just happened? – Do not worry, we will go through all the above step by step, breaking it down. But first make sure you get the expected results from your selenium ruby script.
Run the script.
Run the script by navigating to the location of the folder and typing ruby selenium_part_II.rb
As we discussed in part I, the browser exists and closes the session due to the teardown method executing the following command@driver.quit
What to expect after running our script
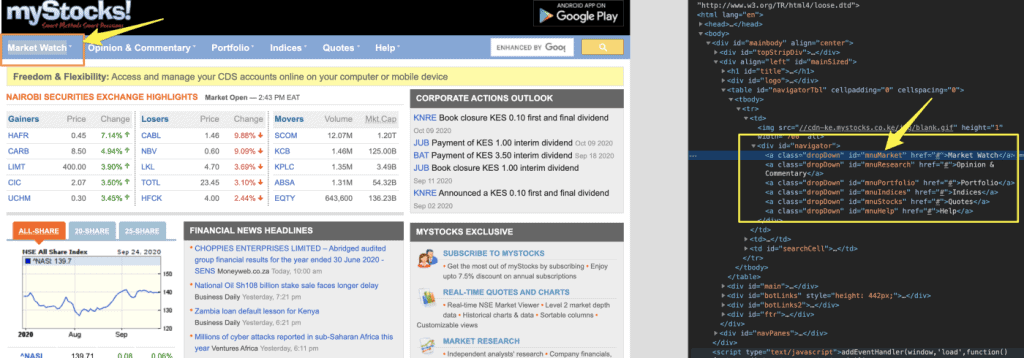
The test will open the site below, and then hover over Market Watch. We will then click on the price-list menu and navigate to a different page with a table where we do a couple of more functions with the data from the table.
A quick inspection of the dropdown element under Market Watch, will reveal the id as mnuMarket as shown in the image above and is activated by hovering over the element.
What just happened?
Holding and clicking the drop-down menu.
This is how selenium can be used to click and hold on a button/element such as a drop down menu or an element that has secondary long press actions, made possible by click_and_hold method.
If you have a quick look at our test, we hover over the element, to reveal a list of select options and we click on it.
# Hover over to market watch and hold so that we can view the options
  @driver.action.move_to(market_watch).click_and_hold
  sleep 5
  @driver.action.move_to(market_watch).perform
# We click the mnuPrice list
  price_list =  @wait.until{@driver.find_element(:id, "mnuPricelist")}
  price_list.click
Selecting table rows and print results for analysis
In automation testing on a UI(user interface), often you may find tables are part of data representation. Here in the script, we use selenium and ruby to loop through each table row and print the text contained in it.
After our script navigates to the pricelist, we can now see a table with an id pricelist.
We use this id to select our table and loop through the elements to print out the text in first row of each element.
Ignoring indexes 0–2 to avoid printing out the table header rows is a neat trick to print out just the contents of the table.
# select the table by it's id
the_table = @wait.until{@driver.find_element(:id, "pricelist")}

trs = the_table.find_elements(:tag_name, "tr")
trs.each_with_index do |row, index|
    # We will filter out the first five rows and
    # ignore the rest to simplify our testing.
    # The reason we filter out rows (0,1,2) is because we want
    # to skip out the title header rows - see Diagram — T1

  if(index < 8 && index > 2)
    puts "#{index}"
    tds = row.find_elements(:tag_name, "td")
     # loop through the columns
     puts "------------------"
      tds.each_with_index do |td, index|
      puts "#{index} : #{td.text}"
     end
  else
    end
end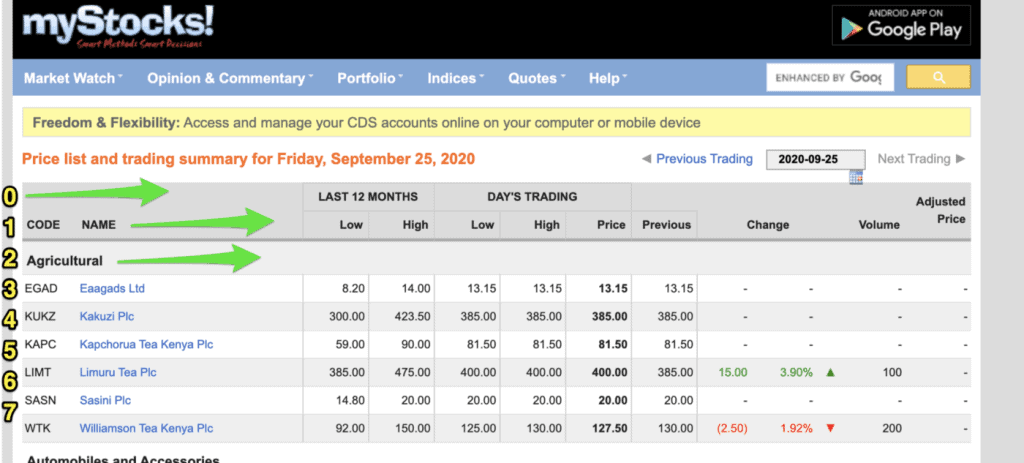
How the table looks.
Conclusion
These were just a few things that selenium can do, other things include — checking and unchecking checkboxes/radio buttons, drag and dropping elements, taking screenshots, executing javascript code..etc. I hope to cover some of these in another tutorial!
Hope this was insightful!
Thanks for reading. Feel free to drop questions/comments below 🙂